|
Homework Problem #6
In this assignment, we will expand our CSAS5 skills to do a multi-unit
problem (like
the
ones that you will perform in the project next month) -- a simple
glovebox
problem involving a mass search. In addition to running the
search,
we will also practice using the 2D plotter that is part of the SCALE
sequence. Finally, we will show you how to take control of the parameters of the
calculation with the PARAM block.
Multiunit problems
Real-life problems cannot be described with a single inside-out
unit. Consider the simple example of two side-by-side
spheres. Since neither sphere encloses the other one, there would
be no way to model such a configuration from the inside out.
What KENO does with this is to let the user define multiple units and
then let units contain other units. In fact, one of the strengths
of this approach is that a unit can not only contain multiple other units,
but can even contain multiple copies of the same unit. Now you
can usually get as fancy with this as you like. (I assume
there is a maximum number of levels of containment, but I have never
bumped up against it.)
For example, if you have an array of identical canisters in a room, you
build the room as one unit, build a single canister in a second unit,
then insert multiple canister units into the room unit. (The largest unit
that contains the others--usually a room or glovebox or something--must be
identified as a GLOBAL unit so KENO knows where to start. (For example, you
can create units for later use and not include them in the current calculation--
KENO will never see them if the GLOBAL unit does not contain them somewhere.)
Let's do an example.
Example: Putting HW#5 canisters in a room.
Let's begin where we left off last time:
=csas5 parm=bonami
HW#5 example
v7-56
read composition
pu    1 1 293 94239 95 94240 5 end
ss304 2 1 293 end
end composition
read geometry
 unit 1
  cylinder 1 1 9.267  3      0
  cylinder 0 1 9.267 18.534  0
  cylinder 2 1 9.467 18.734 -0.2
end geometry
end data
end
We are also going to need a unit to be the room itself. We will
have it be a 3 meter square room with 15 cm thick concrete walls.
First we add the concrete to the material list. As you will
become familiar with later, there are FOUR concrete mixtures available
in the SCALE material library. We will just use the most commonly
used one, which is ANSI standard concrete, material REG-CONCRETE.
Since we will let the concrete be material
3:
...
reg-concrete 3 1 293 end
...
Next, we build the room as UNIT 2 and label it as the global unit.
Remember from the previous lesson that a CUBOID is specified using the syntax:
CUBOID mat# 1 +x -x +y -y +z -z
So we put in:
...
 global unit 2
  cuboid 0 1 150 -150 150 -150 300  0
  cuboid 3 1 165 -165 165 -165 315 -15
...
Notice that (in keeping with the inside-out requirement) I started with
the empty space that makes up the interior of the room and then
surrounded it with the concrete. Also, I put the origin midway in
the x and y dimensions, but made z=0 be the bottom of the interior of
the room. I did this because the units will sit on the floor of
the room, so I made that 0 for my own convenience for placing the other
units (as we will see).
So now, the deck looks like this (with the title upgraded):
=csas5 parm=bonami
HW#6 example
v7-56
read composition
pu 1 1 293 94239 95 94240 5 end
ss304 2 1 293 end
reg-concrete 3 1 293 end
end composition
read geometry
 unit 1
  cylinder 1 1 9.267  3      0
  cylinder 0 1 9.267 18.534  0
  cylinder 2 1 9.467 18.734 -0.2
 global unit 2
  cuboid 0 1 150 -150 150 -150 300  0
  cuboid 3 1 165 -165 165 -165 315 -15
end geometry
end data
end
Okay, if I run this now, the calculation would just be the empty room
(unit 2). This is because the global unit defines the problem;
other units are ignored unless they are (at some level) included in the
global unit. So how do we do this? With the special HOLE
line.
A HOLE line places one unit inside another. The syntax is:
HOLE unit# x y z
where unit# is the number of the unit to be inserted and (x,y,z) is
where it is placed. There are two tricks to using it
properly: (1) how do the (x,y,z) actually place the unit and (2)
where the HOLE line itself has to appear.
First, the x,y,z. The easiest way to think of this is to go back
to the description of the unit TO BE INSERTED and noting where you put the
ORIGIN of the unit. (I told you to remember this.)
For our case, the origin of UNIT 1 is 0.2 cm ABOVE the center of the bottom
surface of the cylinder. (Make sure you see this--it is the negative of the lowest -z level
in the unit--combined with the fact that we did NOT use the special option to
offset the cylinder, so KENO centered it around x=0 and y=0.)
This is the point--(0,0,0.2)--that I think of as the "hot spot" of the
unit.
Now, the (x,y,z) on the HOLE line tells KENO where this "hot
spot" is in the GLOBAL unit. For our example, assuming that we want
the cylinder to be positioned on the floor in the center of the room, the
hot spot would be placed at x=0, y=0, z=0.2. Do you see why z has
to be 0.2? Since we put the floor at z=0, the center of the
bottom surface of UNIT 1 would be at z=0.2 So the HOLE line would be:
HOLE 1 0 0 0.201
Wait! Why did I say 0.201 instead of 0.2?
Because I am a wimp. I always place objects so that there is a
buffer between the enclosed unit and anything else. I do this
because about a decade ago they found a bug in KENO that it would get confused when bottom surfaces of cylinders
were right on the floor like this--it took months of work to rerun all the cases that this bug invalidated.
They say they fixed it, but I do not trust them. So, I always want a neutron leaving the
enclosed unit (the bottom surface of UNIT 1, in this example) to enter the surrounding
material (the empty space representing the air in the room) BEFORE hitting anything
else--even if just for 0.001 cm! Sometimes Monte Carlo codes get confused when a particle
comes close to a "triple point" where surfaces come together.
In this
example, if I put in the 0.2, the point (0,0,0) would be a triple
point where concrete, the vacuum in the room , and the SS304 bottom of the cylinder all come together. I don't
want this to happen, so I raise UNIT 1 0.001 cm higher than it
really should be. This will not affect the answer and will make
me feel a little better. You can do this, too, if you like.
(Or you can be braver than I am and model the geometry correctly.)
The second question is where to put the HOLE line itself. The
answer is a little inconsistent with the "inside out" philosophy:
The HOLE line always IMMEDIATELY FOLLOWS the layer that encloses
it. To apply this, ask yourself where a neutron that leaves UNIT
1 will go--what material the neutron would next meet. In this case,
the answer is the air (modeled as void) that is in the INTERIOR of the room
(which is another reason, by the way, that I levitated UNIT 1 a
bit--now there is no way for the neutron to leave the unit and enter
the concrete directly, so I don't get confused). So, the HOLE
line must immediately follow the material=0 layer, giving us a deck that looks like this:
=csas5 parm=bonami
HW#6 example
v7-56
read composition
pu 1 1 293 94239 95 94240 5 end
ss304 2 1 293 end
reg-concrete 3 1 293 end
end composition
read geometry
 unit 1
  cylinder 1 1 9.267  3      0
  cylinder 0 1 9.267 18.534  0
  cylinder 2 1 9.467 18.734 -0.2
 global unit 2
  cuboid 0 1 150 -150 150 -150 300  0
  hole 1 0 0 0.201
  cuboid 3 1 165 -165 165 -165 315 -15
end geometry
end data
end
Now our deck is (theoretically) complete. If you run it, it will
(eventually) run, with an answer of about 0.9283 +/- 0.0023
You may have noticed that the screen tells you "Now executing kenova", but there is a long wait
before the results start pouring out.
This is because of a subtle inefficiency in the deck that it related to
the Monte Carlo theory we learned earlier. KENO, in choosing the
initial starting point of the first generation, picks points at random
in the geometry and then rejects all of the points that are not in a fissile
material. For this case, the room has a volume of
300x300x300=27,000,000 cubic centimeters, of which only 268 cubic
centimeters is fissile. So, KENO will have to try out about 100
million random points (rejecting 99.999% of them) to find the 1000 that we need inside the fissile material;
this will take awhile.
So, I am going to help KENO out by adding a READ START line,
which is used specifically for the purpose of telling KENO a smaller volume
in which to look.
Without going into all the possibilities open to the user, I am simply
going to redefine the cuboid where "Generation 1" neutrons start within
to a cube that tightly encloses the sphere using the line:
...
read start nst=0 xsm=-9.267 xsp=9.267 ysm=-9.267 ysp=9.267 zsm=0 zsp=3 end start
...
This starts the neutrons uniformly in a cuboid that is smaller than the room
(in fact, it tightly encloses the fissile material in UNIT 1)
and so finds the fissile material more efficiently. ("xsm" means "x start minus", and
I would guess you can figure out the others.)
This line goes right before the "end data" line. (The SCALE manual explains all the options available to you.)
(In your runs later in the semester, you DO NOT have to do this, if you are willing to wait. For your cases,
the wait will probably not be as significant as this--I just wanted to teach you something that may come
in handy later.)
So, for your cut-and-paste ease, the deck is now:
=csas5 parm=bonami
HW#6 example
v7-56
read composition
pu 1 1 293 94239 95 94240 5 end
ss304 2 1 293 end
reg-concrete 3 1 293 end
end composition
read geometry
 unit 1
  cylinder 1 1 9.267  3      0
  cylinder 0 1 9.267 18.534  0
  cylinder 2 1 9.467 18.734 -0.2
 global unit 2
  cuboid 0 1 150 -150 150 -150 300  0
  hole 1 0 0 0.201
  cuboid 3 1 165 -165 165 -165 315 -15
end geometry
read start nst=0 xsm=-9.267 xsp=9.267 ysm=-9.267 ysp=9.267 zsm=0 zsp=3 end start
end data
end
Run it, and the KENO generations will start more promptly and your k-effective should be about
0.9275 +/- 0.0022. (The answer changed a bit, but is still within the uncertainty range.)
As our final little tweak on the deck, I am going to give YOU control
over how many histories are run. If you remember from the Monte
Carlo theory we studied, the user controls three variables: (1)
how many GENERATIONS are run (you get ONE k-effective guess from each
generation) [203], (2) how many neutrons are run in each generation
[1000], and (3) how many generations are SKIPPED before the k-effective
guesses are included in the statistics [3] (i.e., how many generations are
used to "warm up" the problem before we start keeping score). The
bracketed values are the defaults.
For our first guess, we will just put in the defaults. The syntax
for this is:
...
read param gen=203 npg=1000 nsk=3 end param
...
This line goes before the "read geometry" line. (The full
description of parameters available to you are in the SCALE manual.)
So our deck is now:
=csas5 parm=bonami
HW#6 example
v7-56
read composition
pu 1 1 293 94239 95 94240 5 end
ss304 2 1 293 end
reg-concrete 3 1 293 end
end composition
read param gen=203 npg=1000 nsk=3 end param
read geometry
 unit 1
  com='Repeating unit'
  cylinder 1 1 9.267  3      0
  cylinder 0 1 9.267 18.534  0
  cylinder 2 1 9.467 18.734 -0.2
 global unit 2
  com='Room'
  cuboid 0 1 150 -150 150 -150 300  0
  hole 1 0 0 0.201
  cuboid 3 1 165 -165 165 -165 315 -15
end geometry
read start nst=0 xsm=-10 xsp=10 ysm=-10 ysp=10 zsm=0 zsp=3 end start
end data
end
Notice that I also snuck in a COM line for each unit, which is just a COMment line that gives the unit a
title (so we can read our deck a little easier). This is good practice.
Run this and see what happens. ("What happens" is that the answer will change a bit, for unknown
reasons, but should still be within the prevous range; I got 0.9276 + or - 0.0026.)
The most common reason to change the parameters of the READ PARAM line--in this class, at least--
is to change the standard deviation (i.e., the 0.0022).
Generally, I will give you a "desired" standard deviation. There is a very neat
and quick way to do this; if I say that I want the standard deviation to be at most 0.001, then
you add a sig=0.001 to the READ PARAM line:
...
read param gen=10000 sig=0.001 npg=1000 nsk=3 end param
...
You will notice that I changed the GEN parameter from 203 to 10000. This is because if there is BOTH a SIG and a GEN
entry on the line, then KENO will stop whenever it satisfies the first one of these (and if you simply take out the GEN entry,
it will put in the default of 203). In our example, the calculation
would reach the 203 generation count limit BEFORE it reached a standard deviation of 0.001. So we raise GEN to get it out of the way.
Run this version and see what happens.
For me, the k-effective dropped a bit to 0.92756 +/- 0.00099 (which meets the requirement with a little to spare).
But the calculation ran much longer--for me it ran 908 generations. But WAIT! If we only asked for an improved accurace from 0.0022 to 0.001
(a factor of 2.2), why did it run 4.525 times longer? (That is, the generations that "count" went from 200 to 905.)
Welcome to the dreaded "square root" principle of Monte Carlo--if you want the
standard deviation to drop by a factor of x, then you have to run the calculation x SQUARED times longer. (For us, this would have predicted 968 generations
would be needed--we didn't need quite that many, but the principle is valid.)
View your geometry with Keno3D
With the complicated geometries that are possible in KENO, it is very
useful to be able to look at them to check that you are building what you think you are building. Also,
when you are creating a document, it is always nice to have some
drawings to depict your geometry to the reader. For both of these reasons, SCALE has included
a 3D viewer named Keno3D in the package you loaded. The setup probably put a shortcut to it on your desktop; if not, I strongly
recommend that you put in on your desktop by:
1. Going to the c:/SCALE-6.2.1/Keno3D subdirectory set up when you installed SCALE.
2. Right-clicking on the "keno3d" application.
3. Selecting "Copy".
4. Moving to your desktop and clicking "Paste shortcut"
To use this tool, you just double-click on it and open your input deck from the "File" pulldown.
Sounds simple, right? Well, there are some tricks. I am not a KENO3D expert, so I will just give
you a few pointers. (You should spend time with the manual and/or playing around with it to hone your skills.) As I tell you about features,
try them out on the current deck:
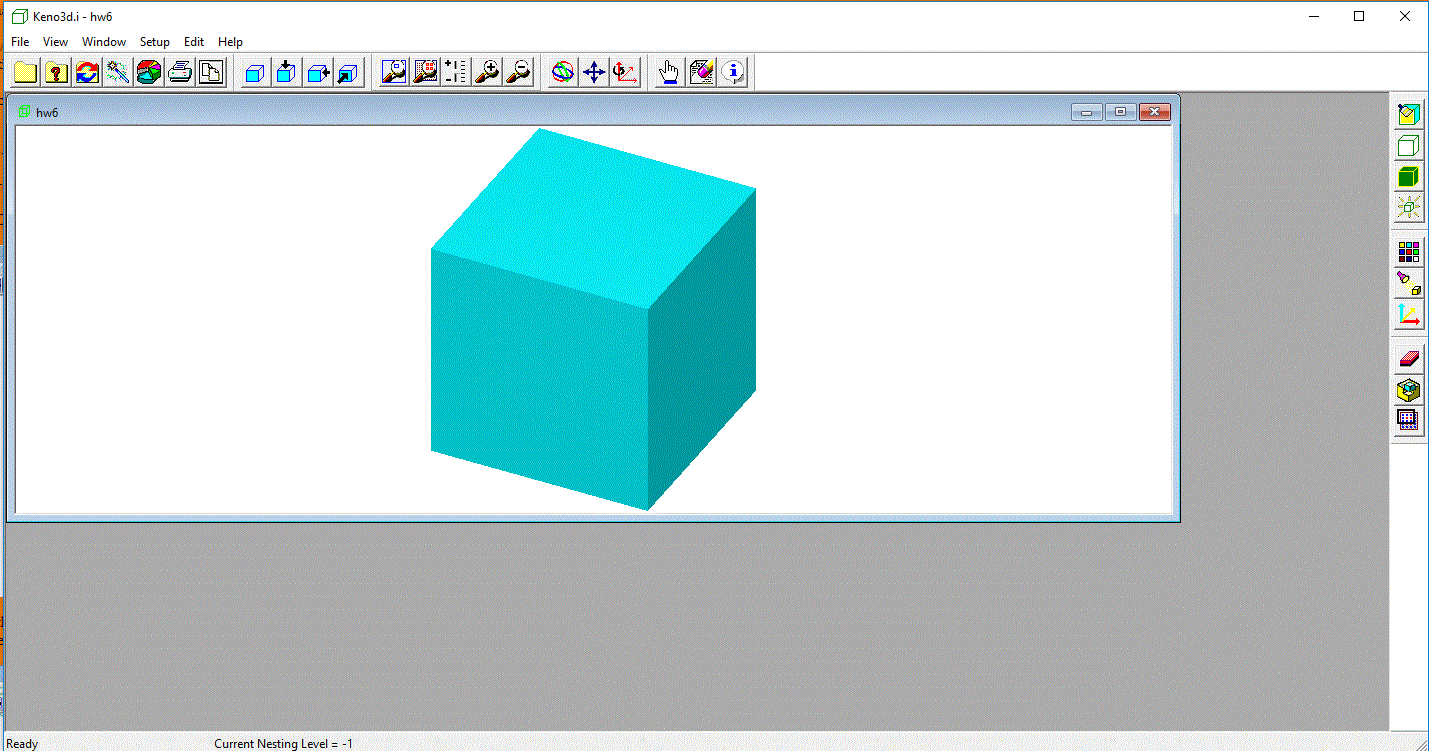
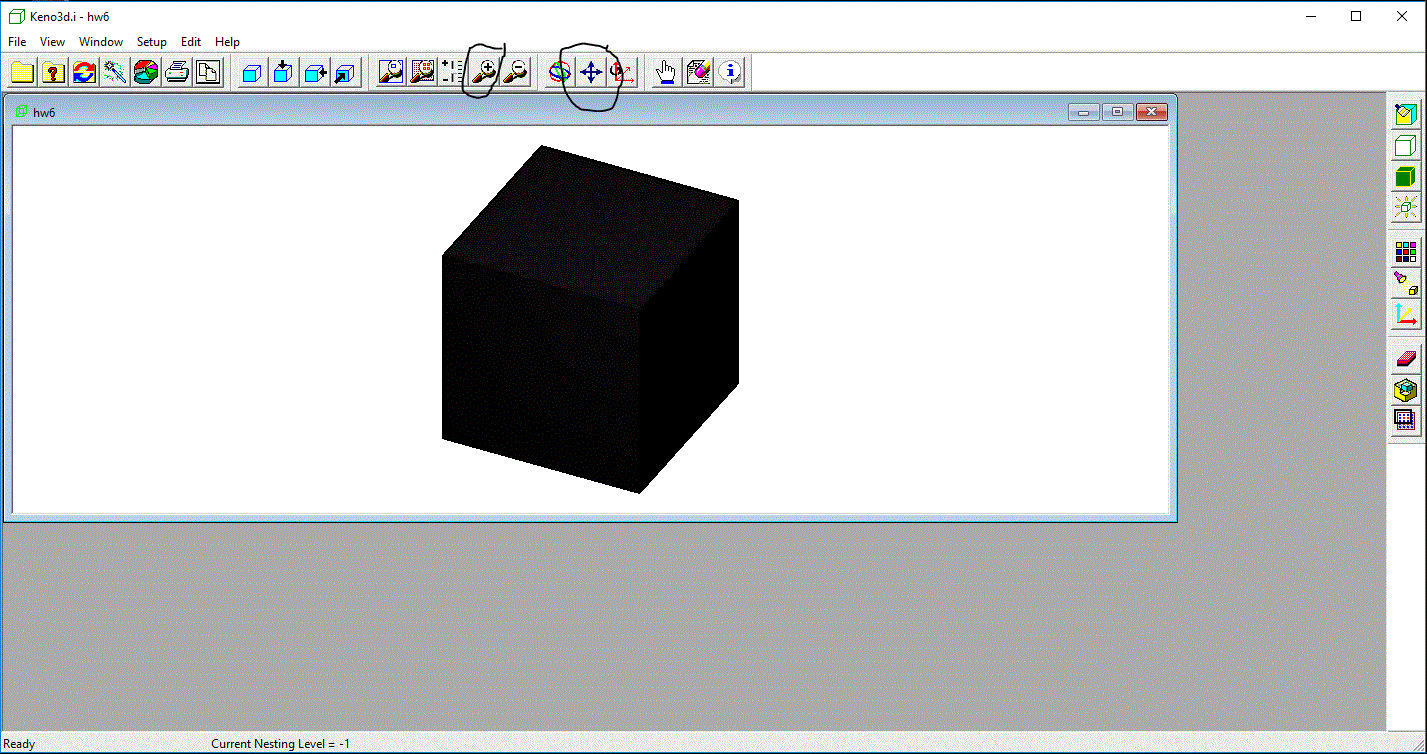
When you first open Keno3D on the deck we have developed, you will either see a solid view of your geometry, with your perspective
about 30 degrees to the right and 30 degrees up, looking
down on your geometry), like below, or it may be a wireframe view. (If it is a wireframe view, skip the next step.) This is what I see:
First let's change it to a wireframe (if it is not already) by clicking on the second icon down on the right column--it looks like a wireframe cube);
it should now look like this:
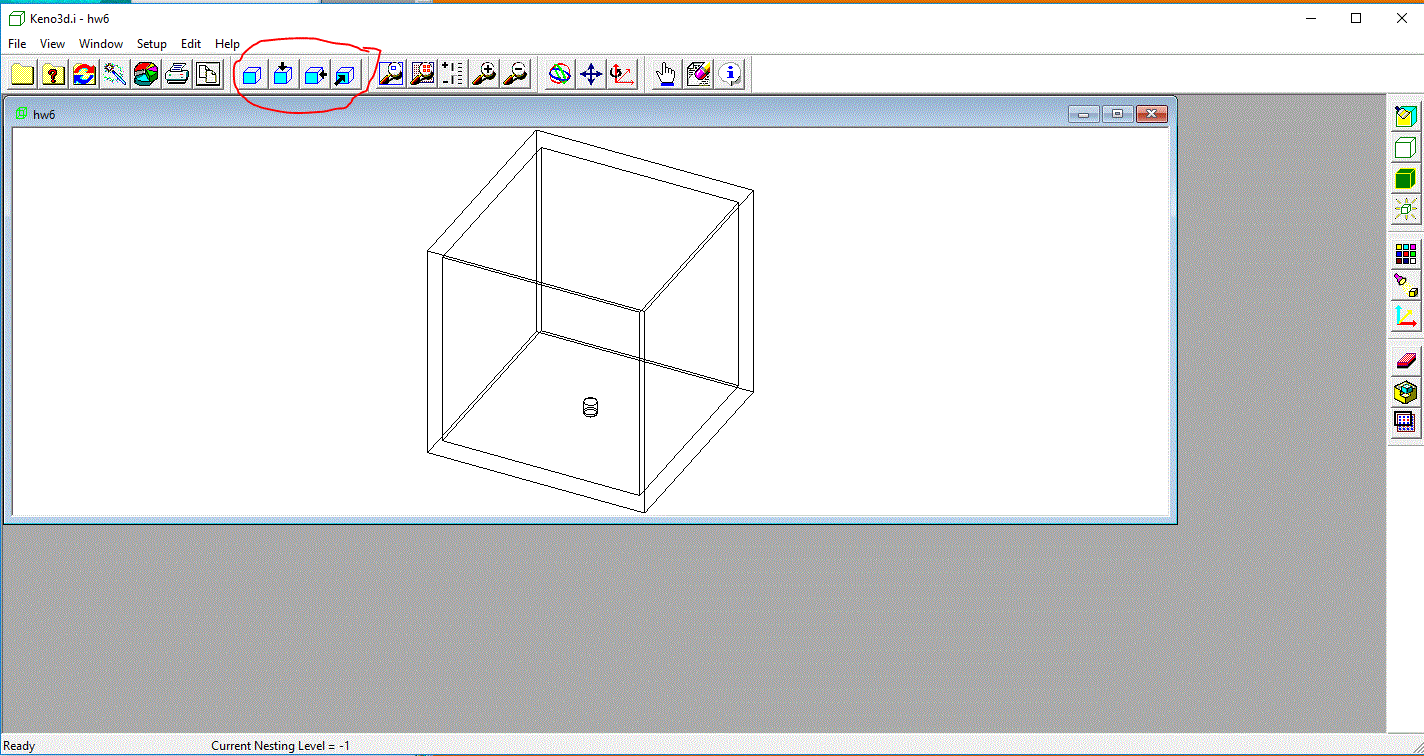
Now let's walk through some of the other control icons on the top and right of the view frame. Starting across the top with the 8th one from the left
(it is the first of four icons--circled above--that are a white box with a blue surface on the
front face. This one has NO arrows.) It just returns you to the view you now have: about 30 degrees to the right and 30 degrees up, looking
down on your geometry.) The other three give you top, front, and right views of your geometry. Here is what the top-down view
looks like (using the button circled in red):
Play with them.
Of the next five--circled in green above--(four of which look like magnifying glasses, I only use the three on the right. The third (middle) one of the five has a
plus and minus and a vertical scale thingy. If you click this one, nothing seems to happen; but if (after clicking on it and seeing
the icon "depress" to show it was selected), if you left-click inside the geometry, hold down the left button, and move the cursor up and down,
the geometry will zoom in and out. The right two just zoom in and out in stages, each time you click.
The next three (the multicolored circles, the arrows up and down, and the one that looks like a Cartesian grid with a little circle around
the z-axis) are used to rotate and translate your point of view. (I often get lost when I use the colored circles to rotate things around, so I have
to go back and click on the first set over to the left--the ones that pop me back to either the original view, a "looking_down" view, etc.)
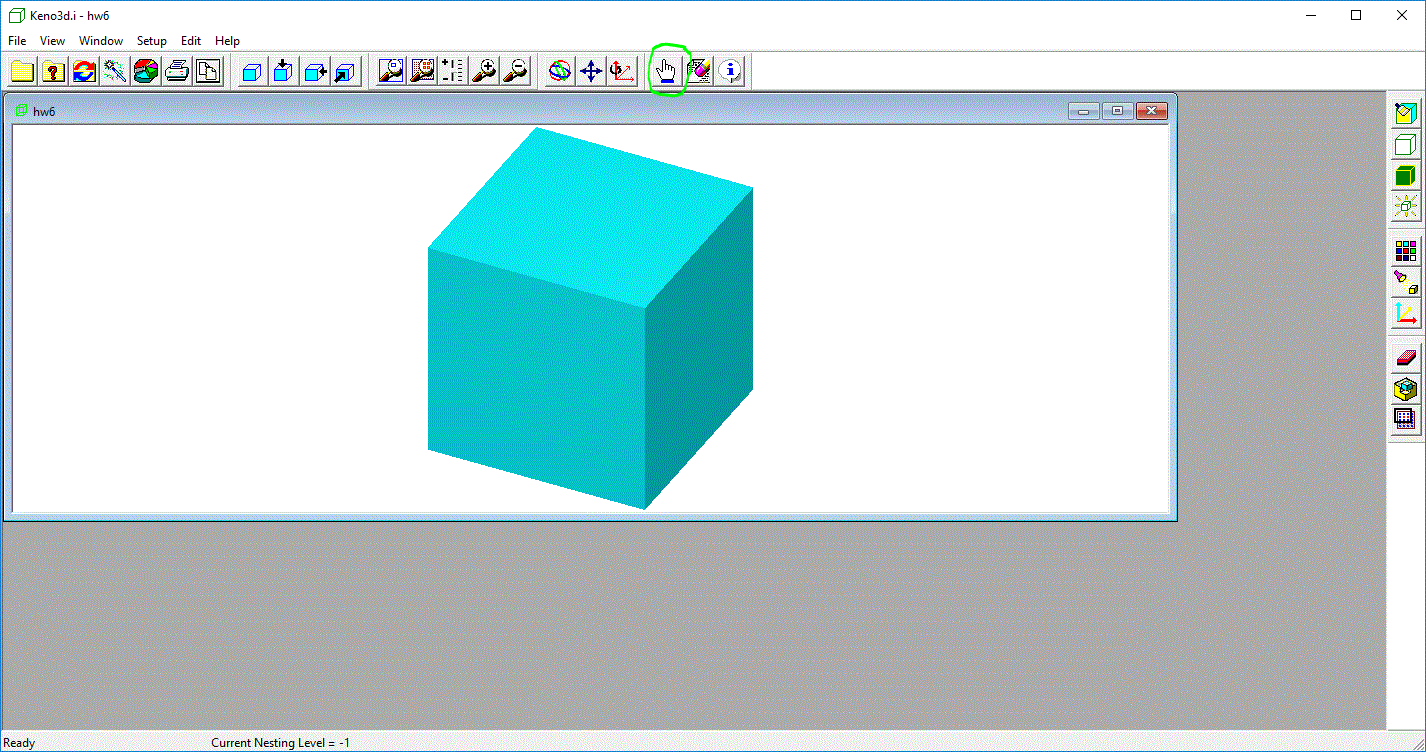
Now starting down the icons on the right-hand side. I don't use the first one. The second two toggle between a wireframe view of your geometry
a solid colored view. The wireframe view is self explanatory; it allows you to see everything in your geometry, but you have to fill in the details
yourself--there is no clue what the cells outline contain.
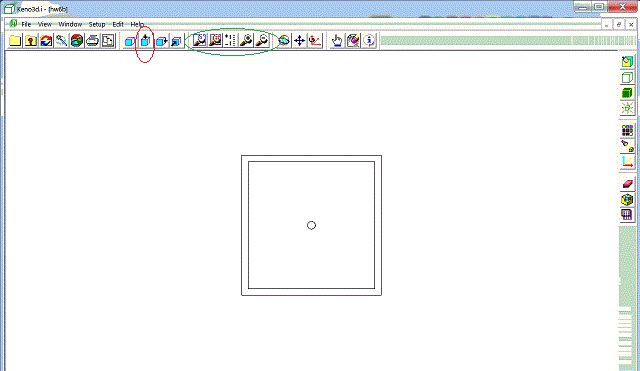
The problem with the more informative "solid" view is that when you click on it (see red circle), all you see is a big bluish cube
(at least it is bluish for me), shown below (with the normal view icon on the far left clicked). This is because every material in your problem is considered to
be OPAQUE, so you cannot see through it.
You can play with this using the "We're number one!" icon on the top (third from the right, circled in green). When you click it, nothing seems to happen, but
with it selected (and visually depressed to show it has been selected), you can then click on a cell in the material and make it disappear.

Don't ask me why it changes color. But, you have several options, indicated by the window that pops up. From the top, (1) you can hide the outermost layer of the cell you clicked on,
(2) you can take out the whole unit, or (3) you can make the material disappear throughout the entire geometry.
That last option is very useful. To see this, choose this option and the bluish (material 2, the concrete) will disappear, only to be replaced by
another cube, as shown below.
But what it this? If the concrete disappears, why can't we see the cylinder? Well, when I said that Keno3D assumes all materials are opaque,
they (for some reason I don't get) apply that to VACUUMs as well. That is, you cannot see through empty space. (I don't quite see why not.)
Anyway, it is easily fixed. Just click on this cube and the popup will give you a chance to make vacuums (material 0) transparent, and you will (finally)
see the cylinder. You can now go back to the wireframe view to see what is inside the SS304 wall, as shown below (after translating and enlarging using the
icons circled in black above).

Okay, that is about the extent of my KENO3D knowledge. When I get the screen to look the way I want, I (being a creature of the previous century), get the
picture into my WORD document by (1) pressing the "PrtScr" key, (2) Opening the Paint application, (3) Pasting in the screen shot using Ctrl-V,
(4) Using the Paint "Select" option to isolate the part of the picture I want to include, (5) Pressing Ctrl-C to copy this sub-rectangle, and finally
(6) Pasting in my WORD document. I know there are more modern ways to do this, but I present it to you as an option. (That is how I got the screenshots
on this page.)
Problem description
For this exercise, we will consider a glovebox operation in which
canisters
of plutonium (95% Pu-239, 5% Pu-240) are brought into the
glovebox
(one at a time), opened, sampled, repacked, and removed from the
glovebox.
We will calculate the "normal" situation, in which the following most
reactive
normal conditions are assumed:
- The glovebox, is the smallest one available to us: a 1/4"
stainless
steel
304 walled, 3' wide, 5' long, 4' high, located 3' above a 2' thick
concrete
floor. (Dimensions are external.)
- The plutonium is in a water matrix inside a 10-liter
cylindrical
canister
of H/D=1.00.
- The glovebox is surrounded (sides only) by 12" of water
representing
operators
surrounding the glovebox.
- The canister is surrounded (sides only) with 1" of water to
represent
the
operator's hands.
- The canister is located in a corner of the glovebox.
- The subcritical limit for k-effective is 0.95.
- The plutonium has a density of 19.84 g/cc (which is the
SCALE default).
Your job is to find the mass of plutonium in the canister to stay under
k-effective
of 0.95. For practice, we will apply the normal criticality
safety practice for k-effective by considering the FINAL ANSWER to be
the REPORTED k-effective PLUS two times the standard deviation.
Units conversion
1. First we need to convert all these dimensions to
centimeters:
3' = 3 x 30.48 = 91.44
cm
inside dimension by subtracting two 1/4" wall thicknesses = 2x0.635 = 90.17 cm
4' = 4 x 30.48 = 121.92 cm
inside dimension = 120.65 cm
5' = 5 x 30.48 = 152.40 cm
inside dimension = 151.13 cm
1/4" = 2.54/4 = 0.635 cm
V = pi/4*D*D*H = pi/4*D^3 = 10000 cc
D = 23.35 cm
R = D/2 = 11.676 cm
R + 1" = 14.216 cm
Computational environment setup
I will assume that you have established your computational environment
and know how to run SCALE problems.
Initial deck creation
2. Create the materials we need.
We will need:
1 - water/Pu mixture
2 - water
3 - stainless steel 304
4 - concrete
The only tricks to the material production are the creation of
the mixture
in material 1 and the choice among the various concretes that are
available
in the M8 SCALE manual. Mixture 1 is created simply by creating
the
water as material 1 and then creating the plutonium (and specifying the
isotopics by weight) and ALSO specifying the MIXTURE ID as
1.
Just to get started somewhere, give each of them a volume fraction
(third entry) of
0.5.
For the concrete, specify REG-CONCRETE.
3. Create the first unit = Canister surrounded by 1" water
For Unit=1 (non-global, with some title of your choosing) create the
Material
1 cylinder of radius 11.676 that goes from -h=0 to +h=23.35 cm.
Then
surround it with the 1" of water (to simulate the hands of the
operator) by using a radius of 14.216 of
Material
2 with the same z levels.
4. Create the second unit = Glovebox which contains the
canister
Remembering the rules of including other units (and of building units
from
the inside out), we will have to:
- Make the air (void = Mixture 0) cuboid with the origin at
the lower,
front,
left corner and dimensions as in "Units Conversion" above (I let
"length"
be x, "width" be y, and "height" be z
- Include the first unit as a HOLE, placed in the
corner. Recall
that
I like an "extra" 0.001 cm as clearance for included objects, so the
position
should be set so that the origin of the canister is at the desired
point
= (14.217,14.217, 0.001)
- Surround the air cuboid with the SS304 (Material 3) cuboid
of 1/4"
thickness
on all sides (e.g., the x dimensions will be extended from (0,151.13)
to
(-0.635,151.765)
- Surround the stainless with the side water (Material 2) --
same z
dimensions
as the stainless, but an extra foot (30.48 cm) on the x and y dimensions
- Surround the water with 3' of air (void) under the
stainless (i.e.,
same
x,y, and +z dimension, different -z)
- Similarly add the 2' of REG-CONCRETE (Material 4) under the
air (i.e.,
again change -z)
5. Put in a title.
Okay. If you did all this, your deck should look like this. (By the way,
if you cut and paste this instead of building it yourself, you are a lazy slug.)
=csas5 parm=bonami
glovebox
v7-56
read composition
 h2o 1 0.5 293   end
 pu  1 0.5 293   94239 95 94240 5   end
 h2o         2 1 293   end
 ss304       3 1 293   end
 reg-concrete 4 1 293   end
end composition
read geometry
unit 1
com='canister'
 cylinder 1 1  11.676    23.35        0
 cylinder 2 1  14.216    23.35        0
global unit 2
com='glovebox'
 cuboid 0 1   151.13        0    90.17        0   120.65        0
 hole 1  14.217   14.217    0.001
 cuboid 3 1  151.765   -0.635   90.805   -0.635  121.285   -0.635
 cuboid 2 1  182.245  -31.115  121.285  -31.115  121.285   -0.635
 cuboid 0 1  182.245  -31.115  121.285  -31.115  121.285  -92.075
 cuboid 4 1  182.245  -31.115  121.285  -31.115  121.285  -153.035
end geometry
read param
sig=.002
nsk=10
gen=100000
npg=1000
end param
end data
end
10. START execution of the SCALE run.
Run the code.
You
will probably NOT want to let it run to completion: once the KENO
starts
running, you will notice that the k-effectives are WAY too high (about
1.5), indicating that a 50-50 volume split contains too much plutonium
(19.84 g/cc * 10,000 cc * 0.5 = 99.2 kg)
The real answer will be down in the "few kg" range. So,
if you
want to try a Pu mass of M grams, the volume fraction of the Pu will
need
to be M/19.84/10,000 (and the volume fraction of the water should be
1.00
minus this value).
Complete the assignment:
Find the maximum plutonium mass (closest 100 grams per canister) that
has
a k-effective below 0.95 (after adding 2 sigma). Because of the
long-running
nature of this calculation, I will accept the uncertainty that comes
with
the default KENO READ PARAM parameters.
You should e-mail me your final input deck and the resulting k-effective
(and uncertainty).
|
 NE421 Introduction to Nuclear Criticality Safety