
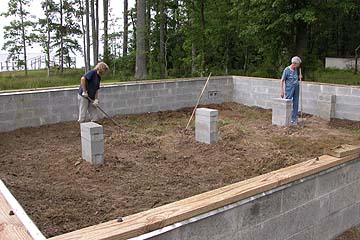
Well, for the summer of 2003, we set aside the month of June to continue working on our cottage. From the summer of 2002, we were left with a foundation, which was a natural stopping point. For 2003, we needed to start adding the wooden structure, so we had to get to a point at which the cottage was waterproof and would be protected from high winds. The first thing we needed to do, unfortunately, was to knock over the pillars we build inside the foundation that we built the previous year and rebuild them. The previous pillars were too tall and too few. In the picture below, you can see one of the previous year's pillars lying on the ground here as Kerri levels a block on the new pillars.
In the photograph below, the new pillars are in place and Kerri and Paul's mom Amanda are chopping all the vegetation out of the foundation to minimize the risk of termites. Also, you can see the sill plate installed on top of the blocks and screwed down on the anchor bolts.
With the new pillars and the mud sill installed around the top of the foundation, it was time to nail the headers to the mud sill. Here, Paul Sr. (Paul's dad) puts a nail in while Kerri supervises.

We should have nailed the floor joists to a single header before doubling the header. This would have made it possible to nail right through the header into the joists. As it was, we had to toenail all the joists to the headers because they were double thick. This was time consuming. As we liked to say, "We'll do it perfectly on our NEXT cottage..." Anyway, below is a picture of Paul on the joists after they are all in place.

Next, the subfloor was nailed to the tops of the joists. Oriented strand board (OSB) was used because it was cheaper than plywood, but it also does not delaminate and buckle as badly as plywood can when it gets wet. Below, Kerri and Paul take the first dance on the half of the new floor already installed.

After the floor was in place it was time to finally spend some time building UP for a change. Below, the first wall is framed and set in place in the front of the house.

Now, the second wall...

... and then the third, shown below. Some of the interior walls have been framed also.

At this point, the fourth wall was not yet framed. Due to the open ceiling design in half of the house and the high winds zoning of this area, the fourth wall had to build with studs that were continuous from the sole plate at the floor to the roof. This complicated things considerably and slowed us down a bit as well.
Paul's dad, Paul Sr. and Kerri's dad Harold helped a lot. Below, Harold and Paul Sr. man the miter saw cutting wall studs and top plates.

Now it was time to decide how steep to make the roof. In the original design, the roof was very steep ( 12-in-12, or 12 feet up for each 12 feet over, a 45 degree slope, very steep for a roof) to allow for the maximum space in the loft area above the bedrooms. However, this would require special ordering 2x12s in a length greater than standard (16 feet is the longest standard length). They would be more expensive and perhaps more importantly, heavier and more difficult to install. In the end, we decided to make the roof as steep as we could with a 16 foot rafter.
In the picture below, Paul is figuring out the slope and overhang for a 16 foot rafter.

One of the biggest contributions to our project was the donation of time to watch after the kids while we worked all day. Without this, there would probably have either been no cottage or the building would have been slowed by many many times. Kerri's mom Amy and Paul's mom Amanda took on the bulk of this effort. Kerri's brother Greg is a favorite of Fiona and Gareth and helped look after them when they were in Greensboro (staying with their maternal grandparents for part of the time). Paul's sister, Ellen also helped out in this regard for several days. Another major contribution from Paul's mom Amanda was the provision of excellent gourmet lunches nearly every day. We worked until lunch and then after lunch until close to dark most days. With Amanda's help, we seldom had to think about what we would do for food. People kept asking us if we thought we had lost weight with all the hard work, but the challenge was not to GAIN weight while eating such excellent food. Below, Amy and Amanda are pictured behind Fiona during lunch one day. Of course, with all the great food around, Fiona still preferred a PBJ and a banana.

In one end of the cottage, we planned to have a "cathedral ceiling" with the rafters and roof exposed underneath. Around the Sound, any buildings with this type of design must have continuous studs in the wall from the floor to the roof. This complicated the building significantly since our construction books did not cover this type of framing. It also made it necessary to wait until the ridgepole and end rafters were in place before we could frame the last wall. Therefore, we first had to erect a pole at each gable end to hold the ridgepole. Another complicating factor in the open ceiling design was the size of beam needed for the ridgepole. In the cottage we used as our base design (Paul's parent's cottage, which has existed for about 45 years), the ridgepole and rafters were of 2x6 lumber. However, due to the existence of building codes, our cottage had to have 2x12 rafters to cover approximately the same span as a 2x6 had done in older cottages. Additionally, because of the lack of floor joists under the cathedral ceiling, a ridgepole made of two 12 inch deep laminated veneer lumber (LVL) beams 30 feet long had to be used as the ridgepole. The two laminated veneer beams were nailed together to form a single beam 30 feet long, 12 inches deep and 3 1/2 inches thick. And this is for a tiny little cottage! The necessity of using such a heavy ridgepole drove the expense and time required up significantly. Below, we are shown erecting the pole to hold the beam at the cathedral end.

At the other end, there was also a heavy pole to hold up the ridgepole. However, it was erected in two pieces because at this end, the loft broke the wall into two sections and did not require continuous floor-to-roof studs in this wall. Below, we are using a 2x12 to make a pattern rafter.

At the other end, Kerri's dad Harold, her brother Greg, and Paul's dad Paul Sr. fit the end for the "bird's mouth" cut.

Because of the size of the ridgepole the normally simple task of putting it in place was magnified tremendously. It could not be lifted by hand, so a boom truck had to be located and hired to lift it. It took about 20 minutes and, due to the minimum charge for the equipment and operator, cost $300. However, we were lucky to find one that could be hired without a week's delay. We were held up for a day and a half due to bad weather, but we finally got it installed. Below is a picture of the ridgepole being put into place.

... and another of it being guided into its pole at the gable end.

Next we installed four long 6x6 posts in the front of the cottage to hold the porch when it is eventually built (summer of 2004). They were set in place and concrete was poured around them in a block that was about 18 inches deep and two feet square. Below the poles are set in place and braced and we are getting ready to start mixing the concrete to pour around them.

Next, we started to put up the sheathing on the exterior walls. Below, Kerri uses a butane powered nail gun to nail up the sheathing to the stud walls. She's wearing hearing protectors because the nail gun sounds like, well, like a gun.

Now it was finally time to start framing the roof! Below, Greg and Paul install the first set of rafters.

We read in one of our books that it was customary to nail a small tree to the first set of rafters installed, so we did. Presumably at one time this symbolized the sacrifice of trees to build the house. However, it is probably not done much anymore.

Not be left out of the family affair, cousin Alex also helped several days. Not pictured but also a big help was cousin Kate.

The rafters went in quickly and the progress was encouraging. Below, Kerri and Paul are nailing the rafters at the top while Alex aligns them at the wall. Kerri got extra points for this because she REALLY does not like moving around in high places. However, the end of the project saw her scampering around like a monkey all over the roof.

Of course, we had to take time out occasionally to remember why we were going to all this trouble. Below, Fiona, cousin Madeline, and Paul return from "island hopping" on the jetski. There aren't any actual islands nearby, but Fiona's favorite pastime on the Sound is to ride on the jetski to undeveloped portions of land around the Sound, which she calls islands.

... and as to why we would choose to build a vacation place so far from our house, below is a picture of all Fiona's and Gareth's cousins on Paul's side of the family.

Well, back to work! With all the rafters up, we could finally frame that last wall. Below is a picture of the cathedral end wall right after framing it.
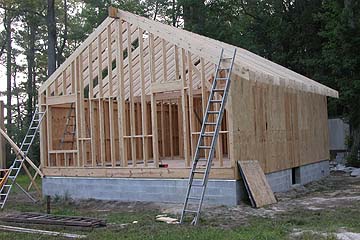
..and then a picture with all the wall sheathing completed and Kerri and Paul Sr. in a victory salute.

With the walls basically finished, it was time to put the roof on. Here we got a tremendous amount of help from David Caraway, Paul's sister Lisa's boyfriend, without whom roofing would have been a much slower job. Below, Paul and David cover the first half of the roof.

The first day of roofing ended right after the back side of the roof was covered and it started to rain. The next day, David was again available so we started on the next side. Just getting the 3/4 inch plywood up to the roof was a considerable job. Below, cousins Kate and Alex aided by Paul Sr. skid a sheet up a ramp to Paul and David.

Unfortunately, the release of the 5th Harry Potter book slowed things down a bit. Below, Kerri enjoys some rare spare time to read a chapter or two. J. K. Rowling has been sent a bill for time lost on the project.

As mentioned earlier, Kerri mastered her discomfort of high places and did much of the roof work. Here, she is nailing down the sheathing at the very top of the roof.

There were four primary factors in determining the roof pitch. We wanted to maximize the room in the loft (which meant a higher pitch) while minimizing cost and effort to roof the cottage as well as giving a good overhang for rain protection (all of which meant a lower pitch). We compromised on our original highly pitched design and built the roof with the maximum pitch we would be able to get from a 16 foot rafter. The slope ended up just under 7-in-12. Below, Kerri is shown on the roof so you can see the pitch. This was about as high a pitch as we would ever care to work on without special safety harnesses. Even at this pitch, the least bit of sawdust or water could send us scooting down the roof toward the safety strip near the bottom edge.

Occasional rain had already stopped work a couple of times while roofing. With the roof on, it was time to cover it with building felt (tar paper) so that water would not damage the plywood. This turned out to be surprisingly difficult, because we couldn't safely stand on the building felt and we had to bend way over to nail it down. The day we put on building felt was one of the longest days of the month. Below, Paul is able to work off a ladder and scaffolding to put on the last strip of building felt.

Next, we had to cover the sides with Typar, a non-woven polymer sheet that keeps moisture off the sheathing and also covers gaps in the sheathing to make the house more airtight.

After the Typar was finished only a few small tasks remained and Kerri headed for Greensboro, where the kids had gone to stay with her parents for a few days, on July 4th. Paul took advantage of the holiday to go sailing. Below is a picture taken on the 4th on the north shore of the Sound.

On the next day, the last few remaining tasks were done. The cottage is shown below from the front as it was when we left it. Next time we work on it, we will frame in the two dormers, the cupola, put on the siding and the roof and build the porch.

Below is a picture of the inside of the cottage in the cathedral ceiling end.

Below is another view of the cathedral ceiling end showing the underside of the roof. We used tongue-and-groove plywood underlayment, good side down so that the underside would give a rustic (but not too rustic) look. Originally we were going to go with 2x6 tongue and groove flooring for the roof, but this is not frequently used now and is consequently relatively expensive. Also, sheet roofing gives more strength to the building. The underlayment turned out to be a good choice for the roof; it gave the look we wanted at a reasonable cost. We will whitewash the underside of the roof to lighten the color but let the wood grain show through.

Below is the view of the interior wall framing looking toward the loft area.

Finally, below is a view of the loft area as viewed from the floor.

Well, that was all the time we allotted for this period. On Sunday, the 6th, having exhausted our supply of time, Paul went by Greensboro to meet Kerri and the kids and then they continued on to Knoxville. We may go back for a week at the end of the summer or early fall to supervise the installation of the septic system and some fill work on the lot. We'll close with a little inspiration for next year....
